
Shoot Sports Like A Pro*

I've put together a short list of how to shoot night sports like a pro. I'm not really qualified to write 'as a pro' but being a constant student of the game, I'm happy to pass on a few of the tips that I've learned - and that work for me.
Shooting
- Use Good Glass
- Use a camera that shoots well at ISO 6400
- Always shoot RAW
- Shoot wide open
- Shoot 'manual' for exposure
- Use Continuous Focus with Tracking
- Get Faces
- Get low to the ground
- Don't Be Afraid of Slow Shutter Speeds
- Use a monopod - sparingly
- Forget VR
- Always be aware of the background
- Have a Game Plan
Editing
- Get a good workflow app. I use Adobe Lightroom.
- It's all about the edit
- Set NR for each ISO level
- Create a Preset for each shoot
- Crop and level, always
- Fix 'over-exposed' grass or turf
- Increase "shadows" for faces
- Decrease "highlights" for white jerseys
- Remove distracting artifacts
And here's the color commentary:
Shooting
Use Primes and Good Glass
I have a very expensive Nikon 70-200 f/2.8 VRII zoom lens. It's generally considered to be the best zoom lens out there (along with the Canon counterpart). But, good as it is - and the bokeh is beautiful - it cannot compare to a prime telephoto. I bought the Nikon 300mm f/4 for just $1,000 and although you give up a few stops, vibration reduction, and the flexibility of zooming, guess what? The pictures are visibly sharper, even to the naked eye. It's about the same size as the 70-200 but lighter. And it focuses very fast. I use that for 90% of my night lacrosse photos. And when there is a 'big game' to shoot, I'll just go to my neighborhood pro store and rent the 300mm f/2.8 "monster" for $50. But it's so darned heavy you'll need a monopod even during the day.
Use a Camera that shoots well at ISO 6400.
There are many cameras that can shoot at ISO 6400 but very few that actually do it well. Any Full-Frame camera will do the job, as well as the 70D and D7100 by Canon and Nikon, respectively. I personally use a Nikon D800 because, in tandem with the 300mm f/4, it gives me flexibility. The camera takes gargantuan photos at 36 megapixels and the price you pay for that is a slower frame-rate of only about 4~5 frames per second. The advantage is that I can do my zooming back home on the computer: I can crop way in, and still have a printable photo. Also, while shooting, with one touch the camera can shift to crop mode, which gives me a 1.5x crop factor - which turns my 300 into a 450 - and a delivers a much faster frames-per-second rate. The resolution drops to 'only' 15 megapixels, but that's the same as my old D7000 and delivers beautiful 11x14 prints. So I've kind of got two cameras in one.
Always Shoot RAW
JPG may give you a faster frame rate depending on the camera you are using, but RAW gives you far more flexibility, which you are going to need when processing your photos back home on the computer. RAW gives you better depth, better highlight breadth, and much better noise reduction capabilities with NR software.
Shoot Wide Open
Of course, you'll want to shoot at the widest (lowest) aperture, in order to maximize your shutter speed, but there's another reason as well: the wider the aperture, the shallower the depth of field. This will make your target 'jump' at the camera while the background is blurred. Just make sure your target is in focus!
Shoot Manual Exposure under Canned Light
Most sports fields have relatively even lighting, but my exposure meter gets thrown off by reflections and by the crowd in the background. Instead, I get a lot more 'keepers' if I simply set the aperture / shutter speed / ISO triumvirate in advance, and just shoot away. If shooting at dusk, you'll need to adjust periodically as it gets darker. For games that start in the late afternoon and go into night, I'll typically shoot the first half on auto exposure, then move over to manual as the field lights take over.
Use Continuous Focus with Tracking
Continuous Focus allows the lens to keep focusing as you track your subject. It's the only way to shoot most sports. One exception: if you want to set a focus point in advance, such as a goal or the goalie. Most DSLR's also have a 'tracking' capability that follows a moving object. This is problematic when you have 21 moving objects (the players) all going in different directions. But my camera has an option to use a 9-point focus screen rather than just one point. Once I 'lock' onto the subject in that 9-point area by depressing the shutter button half way, the camera will then follow that subject even if it moves into an adjacent focus area. So, it's kind of the best of both worlds.
Get Faces
That may sound obvious, but in the 'heat of the action' it's usually the first thing that I forget. Move around the field in such a way that you always have players facing towards you. Know the ref's and where they stand, so you can avoid them. And - most importantly - try to know the players you are shooting, so you can catch their signature moves and also anticipate what they are going to do. You won't need a high frames rate if you know an attackman's release point.

Get Low to the Ground
Lacrosse, Football, and Hockey all feature helmets - which, at night, cast an awful shadow over the player's face. You can get a much better angle simply be getting lower to the ground so that your camera is shooting 'up' - even if it's only one or two degrees 'up'. Try it out. You'll get much better face definition during night games.

Don't Be Afraid of Slow Shutter Speeds
As the evening gets darker and your ISO creeps up towards 6400, your shutter speed is also going to plummet from that 'comfortable' 1/1000 down towards 1/320 or - worse - even lower. Don't worry about it - use it as a photographic technique. Field sports are fast. Show the action by panning along with the movement of your target subject, allowing the background to blur. You might lose a few photos to overall blur, but the effect can be great - blurred backgrounds show motion, as does a player's lacrosse stick that is in a blur with a white ball flying out of it. I've had some really good photos from a telephone lens with a shutter speed as low as 1/160, as long as I'm using a monopod.

Use a Monopod - sparingly
This may seem obvious. Actually I hate monopods because they get in the way of my mobility and make it really difficult for me to get low to the ground - then pop back up to move down the field. But as the evening gets darker, make sure you have that monopod ready. It will gain you at least 2 stops. However, as long as you can shoot above 1/500 sec, its better not to use the monopod.
Forget VR
Those fancy 'vibration reduction' features on expensive lenses are basically useless for sports photography because (a) they slow down the focus time, and (b) they don't really work well when you are panning the camera. Great for portraits and street photography. But turn it off when doing your pro sports shooting. Again - my 300mm f/4 doesn't even have VR and I'm happy with it.
Be Aware of the Background
It's great to focus on the action, but I've ruined so many photos by forgetting that the background is full of distracting crap - especially on high school fields. Stuff like soccer goals, old storage bins and - my nemesis during the state championship games - trash dumpsters - can really kill a photo. Just be aware of backgrounds. Look to get a smooth building in the background. Or if you're moving behind the goal (watch your head!), be sure to line up the background so that you have a crowd in it. Crowds at most lacrosse games don't really fill the stands but tend to hunker together at one or more parts of the stands. Make them a part of your photo.

Have A Game Plan
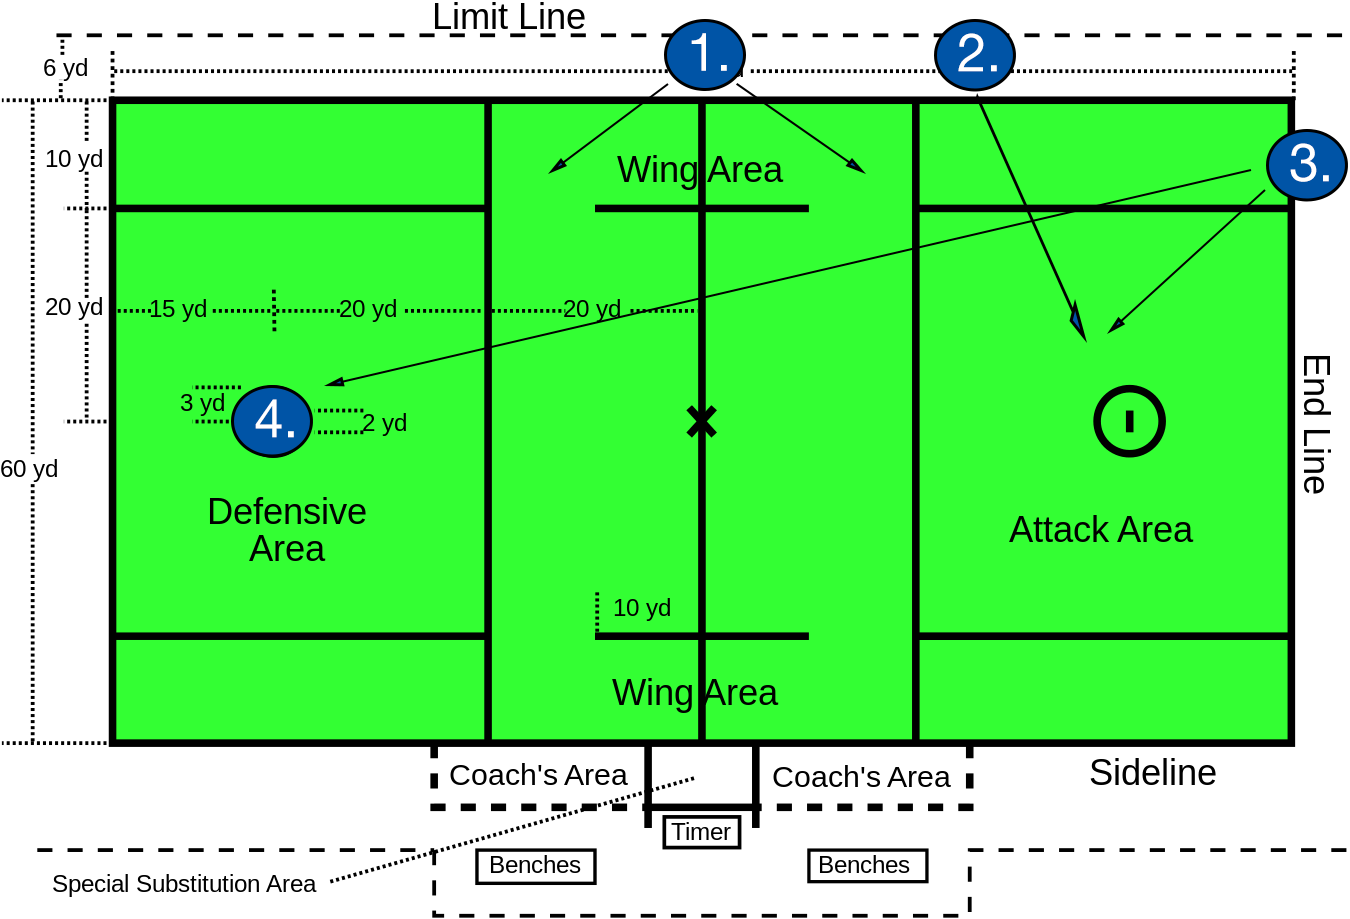
Last but not least - have a strategy for how you're going to follow the game. In the case of Lacrosse, I have a simple 1-2-3 strategy that gives me close shots at both ends of the field, without having to do too much running.
- At face-off, it's always fun to catch the antics of 'getting the ball'. At the center of the field, you also have the option to follow the action quickly to either side.
- On a fast break from the face-off, they can score within a few seconds. Usually though, within a few seconds, one team has gained possession and is moving the ball around the Attack zone. From position #2, I can catch most of that action, plus any shots, plus any steals - which usually gives me enough time to get to "-2" (the same position on the 30 yard line of the other end of the field). If I try to go directly from "1" to "3", I'll miss a lot of action and often miss a good score. Here the ideal focal length is 300mm equivalent.
- If a shot is made and the ball goes out of bounds beyond the end-line, then I'll move to this position. Here the ideal focal length is about 150~200mm equivalent.
- If there is a fast break and the action moves all the way to 4, there's no way I can follow, particularly if I'm 'stuck' all the way back at #3. No problem. I quick-shift my full-frame camera to 1.5x crop mode, which instantaneously converts my 300mm f/4 prime into a 450mm, which is the ideal focal length for field-length shooting.
Note: Stay away from the coach's area. You'll get on everyone's nerves.
Note 2: Stay away from "The box" - that section behind the end-lines that's directly behind the Attack Area. Not only is it dangerous, the refs will likely call "my time" to boot you, which is embarrassing.
Editing
Get a good workflow app
You're going to shoot some 500 pictures during an average game. But that's only half the work. You're probably going to spend almost as much time behind the computer screen as you did behind the camera. Get a good photography app that helps streamline workflow and editing. I use Adobe Lightroom. Apple Aperture is also pretty good. Most of the comments I make in this section refer to Adobe Lightroom but can also be achieved with the other workflow apps.
It's all about the edit: choose the right photos
Out of a 500-shot game, I'll end up with maybe 10 photos that I feel are publishable. They always show at least one face, and the action is moving towards the camera. Not easy to do. If I want to 'chronicle' a game, I'll select about 50 photos that represent - in my opinion - the key elements of that particular game. And if I want parents to buy photos, I'll select a much wider range, but again always being sure to show faces clearly. Action without a face is rarely of interest. Of course, there are exceptions...
At first, I go through the entire shoot and rate my shots '1' or '2'. '2' means it's probably going to go up on my website. '1' means it's probably not going to, but I want to keep it anyhow. '3' means it's probably a 'highlight reel' photo or one that I'll want to make available for Media to pick up. After this first round, I'll delete all un-rated photos, then go back and apply edits to the ones ranked '2' or higher, using the editing techniques outlined below.
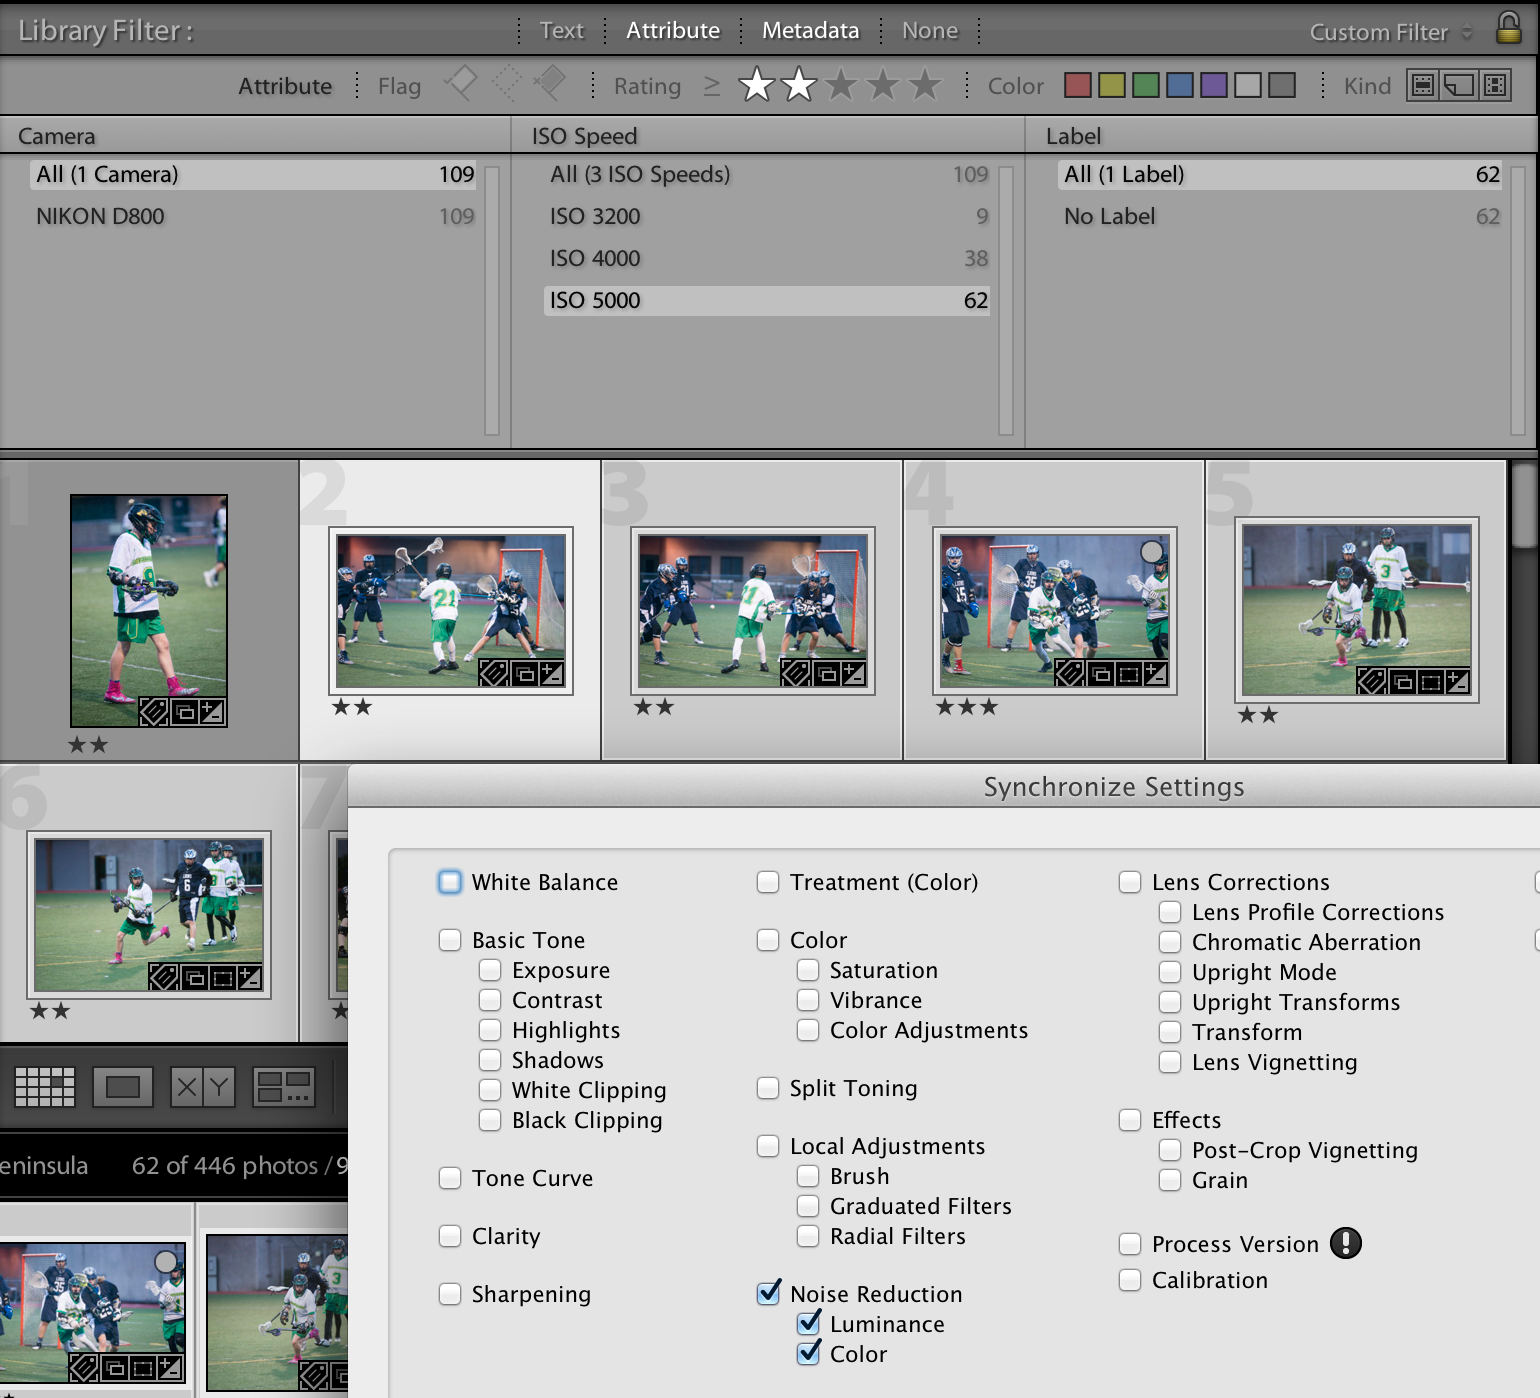
Set NR for each ISO level
In most cases, the amount of Noise Reduction that you want to apply is relative to the ISO level of your specific camera, not to the specific shoot (there are exceptions such as shooting at high ISO with daylight vs in dark night). For my camera, I apply 5% at 3200, 10% at 4000, and 15% at 5000 and 6500. You can set this in Lightroom so that it is applied automatically at the time you import your photos. The other way to do it is:
- Filter your photo shoot for a specific ISO using the metadata filter
- In Develop mode, apply the desired NR settings
- Back in Library mode, select adjusted photo then select the rest of the filtered photos.
- Choose Synchronize Settings and make sure ONLY "Noise Reduction" is applied.
Create one or more Presets for each shoot
 Instead of making adjustments to each photo, you can use your adjustments for one photo to create a Preset which you can then apply to other photos in the shoot. The "Sync Settings" feature in Adobe Lightroom allows you to apply the settings of one photo to a number of other photos that you've selected. I find that handy for applying global settings such as the noise reduction for different ISO levels. But I find it more handy to create one or more presets for each shoot because typically I'll discover that there are several different 'lighting types' that generally describe my entire shoot. For example, 'shots where the background is black' or 'shots where there's lots of turf'. For each of these, adjust settings then create a Preset from a representative photo. Then, as I'm going through my 'selection' photos (see above), one click applies the settings to each photo or range of photos.
Crop and level, always
Maybe I'm AR, but there are two things that drive me crazy about other peoples' photos: ones where the playing field is slanted like a ski slope, and ones where Johnny is a dot in the distance. If you have a new DSLR, chances are it has at least 24 megapixels. Use those. Crop the crap out. By cropping, you can 'zoom' in so that the top of the frame is just above the height of the player(s) and the bottom is just below. And cut out any players who are not a part of the immediate action. Likewise, level your photos. It's easy to do this if you have an obvious line to trace, such as the edge of a playing field (as long as it is perpendicular to your camera) or stadium stands. If you crop and level, your photos will look much more professional.

Fix 'over-exposed' grass or turf
Grass can reflect stadium lights and turf is positively horrible. I negate these by using the 'graduated filter' feature of Lightroom to under-expose the turf (which is usually the bottom 1/3 of my photo). Tip: apply this as a Pre-set then use it for all of your photos that have, for example, turf on the bottom half of the photo. You can fine-tune each individually, afterwards.

Increase 'Shadows' for faces
Faces tend to be darker than other parts of a player, and that's actually the part that you want to see the most. In Lightroom, slide the "Shadows" slider to the right to increase the amount of exposure that applies to parts of the photo that are in shadows. Use this judiciously. You can also use the Adjustments Brush to localize this. Shadows also works well on individual players who have darker skin or who are wearing very dark uniforms. Tip: when you apply 'Shadows' to an entire photo, you might want to try increasing the 'Black' settings. This delivers a strong contrast and makes the entire photo 'pop'.
Decrease "highlights" for white jerseys
Ever notice how you have dark jerseys and light jerseys, and you can't get them to both show up well? Increasing the overall exposure (or shadows) to show dark jerseys is okay, but that leaves white or light-colored jerseys 'blown out'. You can fix this by simply decreasing the 'Highlights'. Again, apply this as a Preset at the beginning of your edit for each shoot.
Remove distracting artifacts
Ever notice how there are lacrosse balls on the edges of the field? They are usually placed there on they are usually placed there on purpose but they sure get in the way. Use the Spot Removal tool to clear any obvious 'blemishes' from your photo, just as you would, well, blemishes from a model's face.